Flight Test Requirements
Required Materials:
- Club Badge
- AMA card
- Suitable equipment
Knowledge:
- Field rules
- Basic flight aerodynamics
- Airplane parts and operation
- Safety rules and etiquette
Safety:
- Suitable equipment
- Preflight inspection
- Proper frequency control
- Safe starting procedures
- Calls out intentions on flight line
Development of Practical Skills:
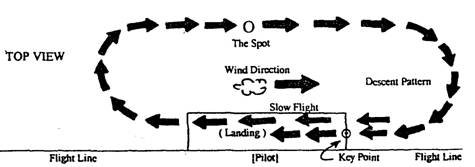
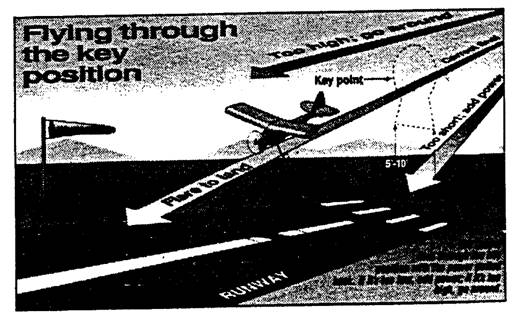
The development of practical skills never ends in flying. This required activity is the primary reason why people get into RC modeling. Some people attempt to fly without instruction and almost always end up with piles of wreckage. The concept of qualified members who have passed a qualification flight test and the applicant who will train to meet those requirements are the primary reasons for our club to exist. The practical skills test demonstrates the applicant’s ability to maintain adequate control of the aircraft at all times and in any direction. The flight maneuvers are intended to prove the applicant’s ability to make the aircraft go in an INTENDED direction, not as a test of precision flying ability. The applicant must exhibit proper safety and field etiquette procedures. The examiner must note unsatisfactory performance and provide a written record to be used by the applicant and instructor for further training if required. All the practical skills are intended to develop the capability to fly the pattern fully and through the Key Point in both directions. The Key Point is 10 to 15 feet above the runway and is located at the end of the runway as a plane descends for its landing. The plane should glide through the Key Point to establish the proper touch down point for the landing.
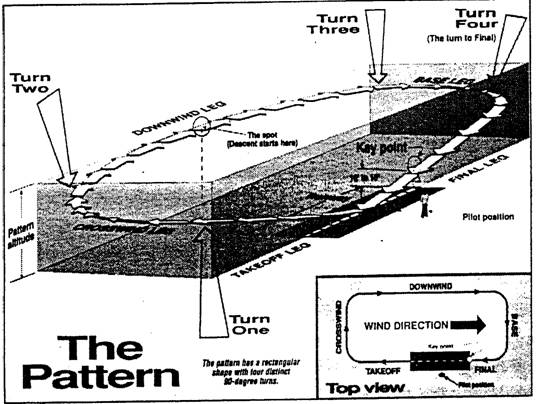
Flying the Pattern:
The pattern contains all the necessary maneuvers to make landings in the consistent manner that all pilots follow as a standard. Your instructor is interested in developing your skills and capabilities to fly the pattern with relative ease. Please review the pattern as shown below to learn the location of the Flight Line, the Spot, and the Key Point. The Flight Line is located along the pilot’s edge of the runway. We are trained never to fly through or over this line. The Spot is located in front of the pilot (about 200 feet) and 50 to 100 feet high in altitude. On a downwind leg the Spot represents the location to reduce power and descend into the landing pattern into the base leg and final approach to the Key Point. This maneuver will require a lot of practice, but forms the basis of becoming a good pilot. As you develop your approach skills, you will also learn to adjust the aircraft rate of descent through the Key Point.
This blending of the rate of descent and accuracy of flying through the Key Point will provide the clean landing that all pilots strive to achieve.
Flight Testing Maneuvers:
The following maneuvers are considered to be essential to an applicant’s ability to fly in a safe and controlled manner. Remember, we are not establishing precision maneuvers, but rather we are establishing the proper procedures and intended safe maneuvers.
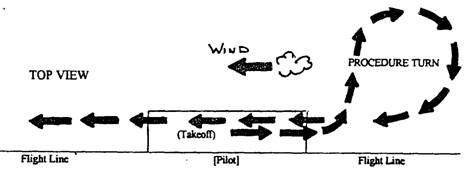
Taxi, Takeoff, and Procedure Turn:
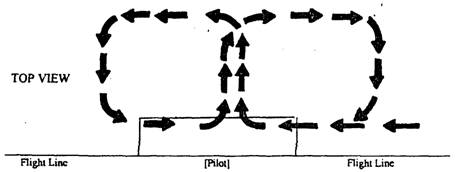
Taxi and takeoff requires the development of skills to hold a straight line into the wind. The ability to hold a straight line is greatly influenced by the aircraft and its wheel alignment. This is true for both the tricycle and tail dragger. The aircraft should be checked frequently for wheel alignment. Remember to check the wind prior to takeoff. Trainer type aircraft with flat wings need to be carefully controlled in crosswinds. If you turn from the flight line too early (before getting good air- speed) the crosswind can push up the upwind wing and cause a wingover crash. Get some altitude and airspeed before initiating the procedure turn. This turn starts with the initial turn away from the pits or flight line (90 degrees), then a turn at constant altitude that will cover 270 degrees back to the runway. Heading adjustments can be made on the return (see figure below.)
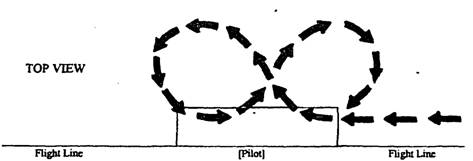
Horizontal Figure Eight:
To demonstrate aircraft maneuvering skills, the horizontal figure eight provides all the turns required in pattern flight. This maneuver should be conducted at about 100 feet of altitude, with the crossover point 200 to 250 feet in front of the pilot. Maintaining altitude is one of the measurement parameters in the horizontal level.
Square Figure Eight:
The square figure eight is conducted the same as the horizontal figure eight except that all the turns are squared. This maneuvering enables the instructor to see some precision in flying skills, while maintaining a constant altitude in the horizontal level.
Slow Flight and Landing:
This maneuver demonstrates the flyer’s ability to fly near a stall speed at an altitude of 20 to 30 feet the full length of the runway. This speed is obtained by setting the throttle at the 1/4 to 1/3 setting. This maneuver should be flown into the wind for safety reasons and the pilot should be aware of the flight line, should maintain a straight line, and should hold a constant altitude. The ability to land an aircraft, in most cases, is the most challenging part of learning to fly. Learning to fly the pattern, turning capabilities, maneuvering, slow speed flight, and awareness of the Flight Line, Spot, and Key Point are all important elements of the model pilot’s expertise. All experienced pilots will tell you that the most important maneuver in flying is practice, practice, practice.